Making your own tack for your horses has a big upside. It's custom fit for the horse and the quality is as good as you can make it. I made the saddle for my pack horse and it's lasted for 12 years now and has seen all sorts of rough duty. Nothing has ever failed, and I don't ever expect it to. My saddle for my trail horse was made for me by a saddle maker I know since I don't have some of the equipment needed for the job. It too is custom fit and when you ride for days on end having a saddle that fits the horse and your backside well can be a blessing. This post is about how I made a pack saddle.
The first thing you need is a sewing machine that can accept heavy duty needles and thread and go through at least 4 layers of heavy weight duck canvas. I use duck canvas because it's relatively inexpensive, comes in a variety of neutral colors, and can be made water resistant or nearly water proof. A mixture of beeswax, and linseed oil makes for a good water resisting agent or you can use a silicone based commercial product.
There are two basic types of pack saddle, the Sawbuck, and the Decker pack saddle. I made a variation of a Decker saddle. Here's a picture of it. For leather, rings, buckles, and other items I use Outfitter's Supply. They're a great company out of Montana, and the quality of items they sell is first rate.
The first thing to make is the saddle tree that rests on the horse's back. I cut two pieces of 3/4" oak to oval shape then steamed and bent them to fit the horse's back. I set up my bending jig using coat hanger wires I had bent to fit the horse. For a steam box you can do an Internet search for all sorts of methods. I used an old pressure cooker attached to my box and steamed the wood for 2 hours. The tree pieces should rest as much as possible along the surface of the back. The more the bearing area the better. Even though you'll use a saddle blanket and pad the comfort of the horse will be greatly enhanced if the tree fits well.
Here's a couple of photos of the saddle tree. In those photos you'll see how they are joined by metal bars. I used 1/2" re-bar heated and bent to shape with the ends forged flat to screw into the oak pieces. I used re-bar because it provides for a nice grip for tying or strapping other items. I attached hooks on top of the bars to hang the panniers off the side. I can then tie other items as needed above that. The oak is bent in both the longitudinal direction as well as within the slope to provide a better fit. The wood is stained and coated with polyurethane to protect it.
The leather is all 10-12 ounce oak tanned leather riveted for permanent connections or screwed with 1/4-20 stainless hardware with finish washers so the screw ends don't "grab" at things. The rivets are all #9 copper rivets. For attaching the screws and bolts I used T-nuts countersunk into the wood from underneath. I always use blue Loctite thread lock for keeping the threads from vibrating loose. I carry spare hardware because when the load is hanging off the horse the wrong way he's not happy, and you aren't either.
Behind the saddle tree I use a back pad and then a rear harness pad to keep the load from sliding forward. A breast strap keeps the load from sliding backwards. The rear pads are made with a thick felt against the horse and duck canvas for the other side. I cut and sewed furniture pad material to fill the rear pads.
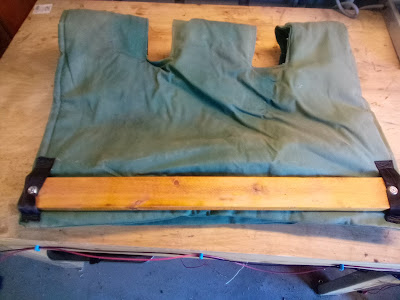
To keep the whole thing neat and tidy and to help distribute the load along the horses ribs I sewed a pad with slots for the saddle tree bars, and wooden slats screwed through the pad. Once again it's duck canvas with furniture padding cut to size and shape inside.
So there you go, a modified Decker Pack Saddle. The total cost was about $350 but quite a bit of time.


.jpg)


No comments:
Post a Comment